Flip Dashboard
Welcome to Flip for Business Dashboard, Your command center for handling integration and transactions is this potent tool. Whether you need to manage users, track transactions, retrieve API keys, set up API callbacks, or even make payments and distribute them, we have you covered. All the capabilities you require to optimize your operations are available in the Flip Dashboard.
Find and Export Transactions History
The Flip Dashboard allows you to quickly locate and review specific transactions using its intuitive search and filter features. Follow these steps to find a transaction:
- Log in to the Flip Dashboard Use your Flip credentials to log in and access the Flip dashboard.
- Navigate to the Transaction History
From the main menu on the left side, select the Menu transaction that you want to find. This bellow list of menu for Transaction History
- Money Transfer -> Transaction History
- International Transfer -> Transaction History
- Accept Payment -> Payment History
- Use the Search Bar
At the top of the Transaction History page, you’ll find a search bar. Enter relevant keywords:
- For Money Transfer
- Can find by:
Transaction ID,Account Number,Amount,Beneficiary Name, andRemark
- Can find by:
- For International Transfer
- Can find by:
Transaction IDandBeneficiary Name,
- Can find by:
- For Accept Payment
- Can find by:
Transaction ID,Title,Sender Name,Amount, andTransaction Status
- Can find by:
- For Money Transfer
- Apply Filters
For a more refined search, you can use the filter button options located beside the search button. You can filter transactions by:
- For Money Transfer
- Can filter by:
Date/Range Date,Status,Bank/VA/E-Wallet, Transaction created viaDashboardorAPI
- Can filter by:
- For International Transfer
- Can filter by:
Transaction CreatedandBeneficiary Name
- Can filter by:
- For Accept Payment
- Can find by:
Transaction ID,Title,Sender Name,Amount, andTransaction Status
- Can find by:
- For Money Transfer
- Review Transaction Result Once you find the desired transaction
- Money Transfer
- Transaction ID: Unique identifier for the transaction that was generated by Flip
- Status: See if the the transaction status is
Successfull,CancelledorFailed - Transfer Destination: See the destination is for
bankore-wallet - Account Number: See the beneficiary account number
- Amount: Amount of disbursement transaction
- Remark: Remark transaction
- Maker Name: The person who is created the transaction
- Created Date: The date of transaction created
- Completed Date: The date when the beneficiary user received the fund
- International Transfer
- Transaction ID: Unique identifier for the transaction that was generated by Flip
- Status: See if the the transaction status is
Successfull,CancelledorFailed - Beneficiary Country: The Country of beneficiary account
- Beneficiary Bank: The name of beneficiary bank that receive the fund
- Beneficiary Name: The beneficiary account holder name
- Account Number: See the beneficiary account number
- Amount Sent: The amount that was requested to disburse
- Amount Received: The amount transaction receive by the beneficiary
- Created Date: The date of transaction created
- Completed Date: The date when the beneficiary user received the fund
- Accept Payment
- Transaction ID: Unique identifier for the transaction that was generated by Flip
- Payment Link:
- Payment: The title of bill payment for
- Sender Name: The name of
- Channel: Payment method name
- Amount: The amount of transaction
- Status: Status of transaction
- Settlement Status: The settlement status of transaction
- Transaction Reference No: The reference no transaction that was generated by merchant
- Settled Amount: The amount of fund that was settlled to your bank account
- Export or Download
If needed, you can export the search results by clicking on the "Ceate Report" button. This allows you to save the transaction details as a
.xlsfile for your records.
Currently the file format only support for microsoft excel .xls only
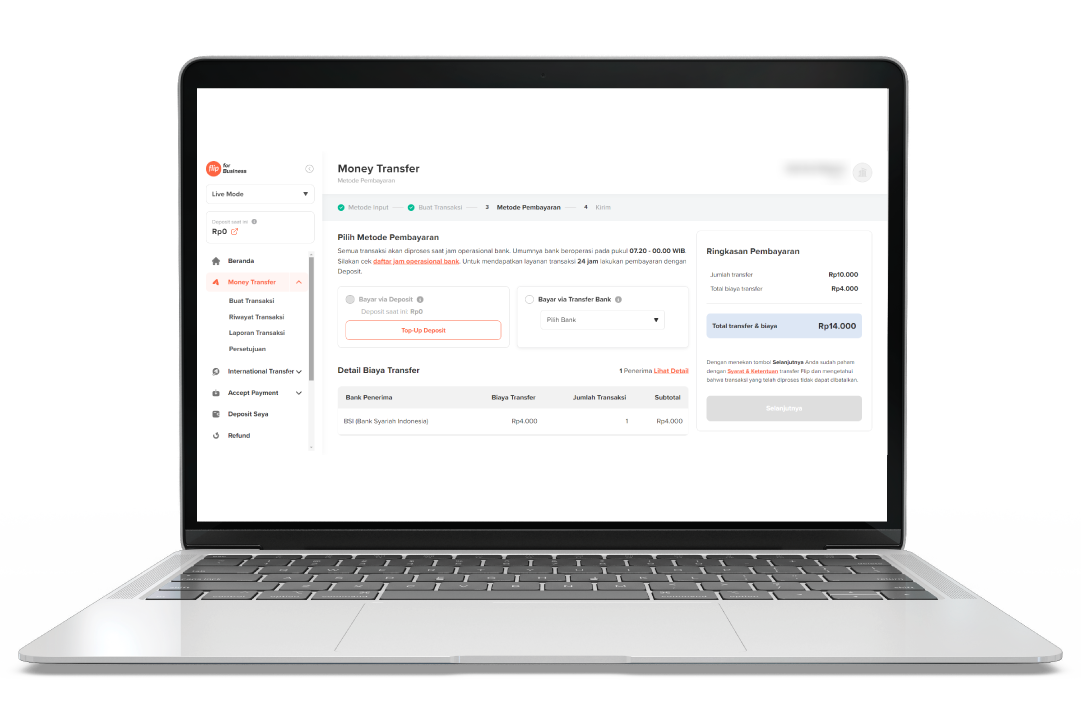
Top Up Flip Deposit
Before you can start making disbursement through Flip for Business, it’s essential to top up your Flip for business deposit. Here’s a quick guide to help you through the process:
- Log in to Your Flip for Business Account
- Access your account through https://business.flip.id/.
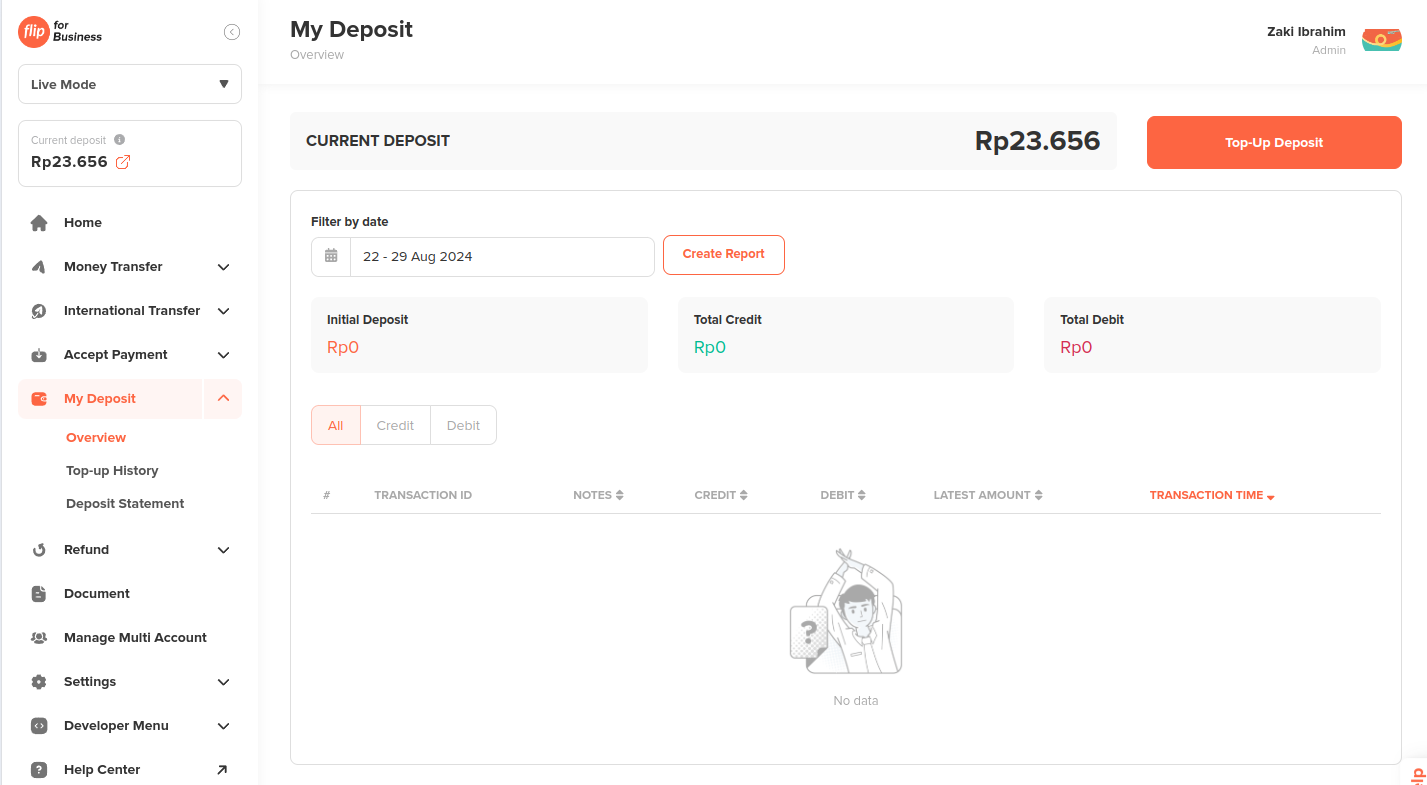
- Navigate to “My Deposit”
- Click on “My Deposit” from the left side menu.
- Click “Top-Up Deposit”
- On the “My Deposit” page, click the “Top-Up Deposit” button on the rigth top dashboard page
- Enter the Top-Up Amount
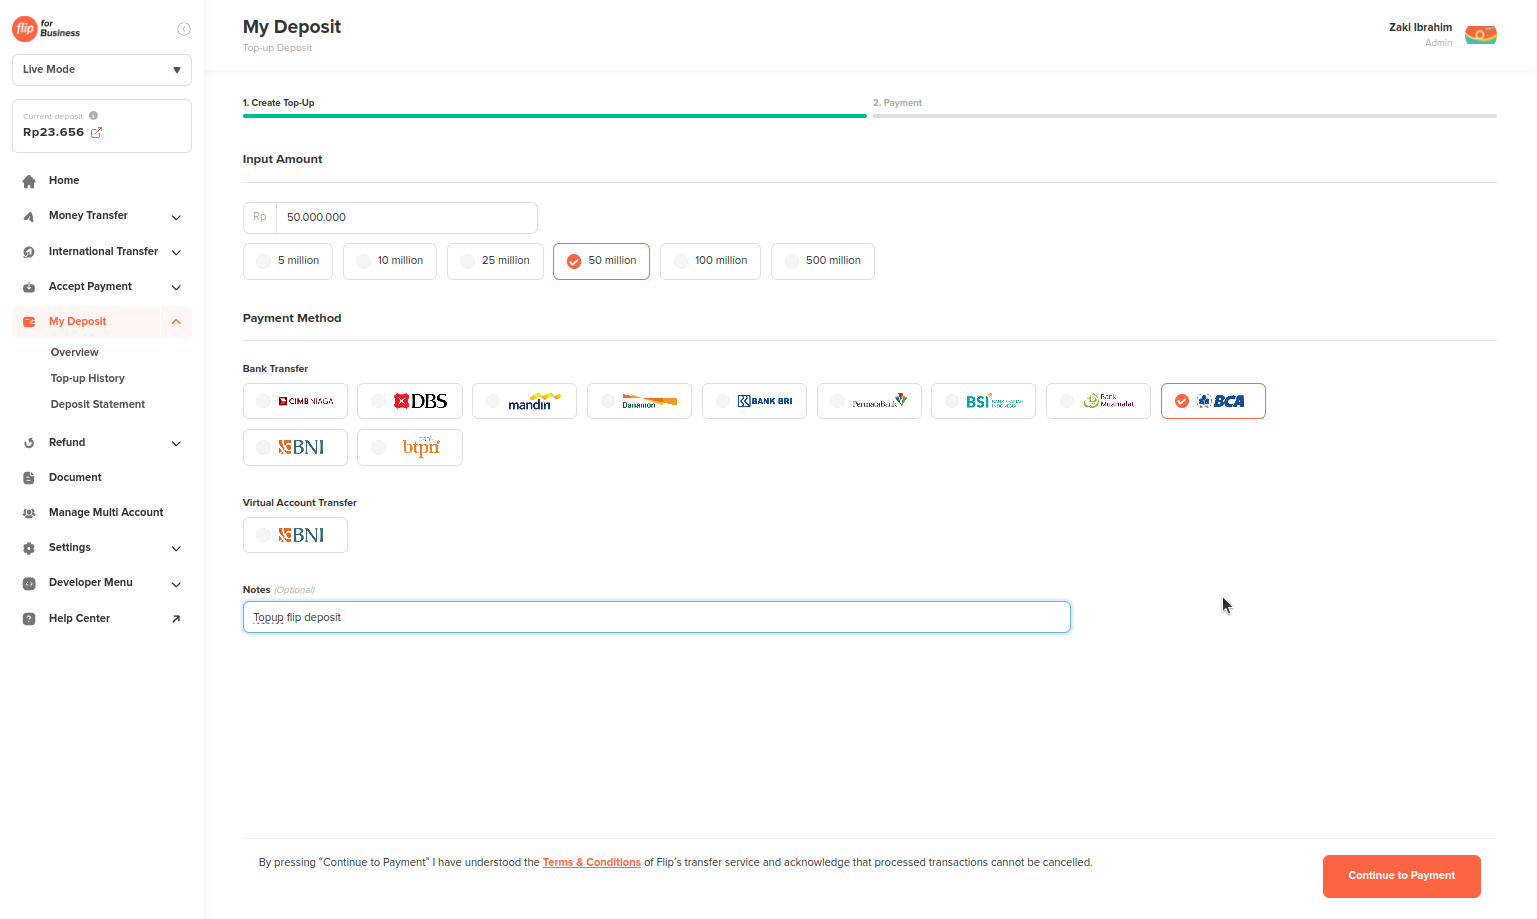
- Fill in or select the top-up amount options, then choose the bank you will use to transfer the funds.
- Add a note if necessary. Once done, click
“Continue to Payment”on the right bottom page.
- Verify the Transfer Amount and Payment Your TopUp
- Double-check the amount to be transferred and payment your topup, ensuring you transfer the exact amount down to the last 3 digits.
- Check Your Transaction Status
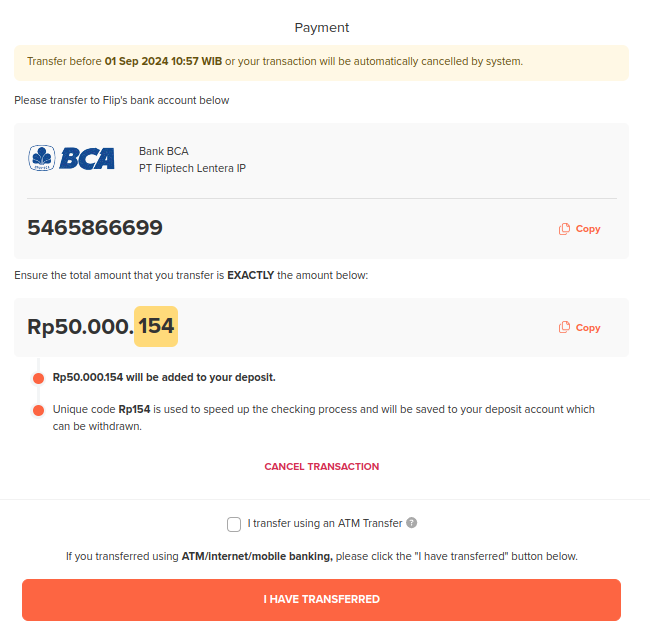
- If you payment the topup via ATM, please check box "I transfer using an ATM Transfer".
- Click button “I Have Transferred” after payment, so the Flip system will process your topup transaction shortly.
- You can check the status of your transaction on the
“Top-Up History”page.
Download Flip Invoice Document
The Document section in the Flip for Business dashboard allows you to view and download your monthly transaction invoices. These invoices are essential for tax reporting and record-keeping purposes. Follow the steps below to easily download your Flip invoices.
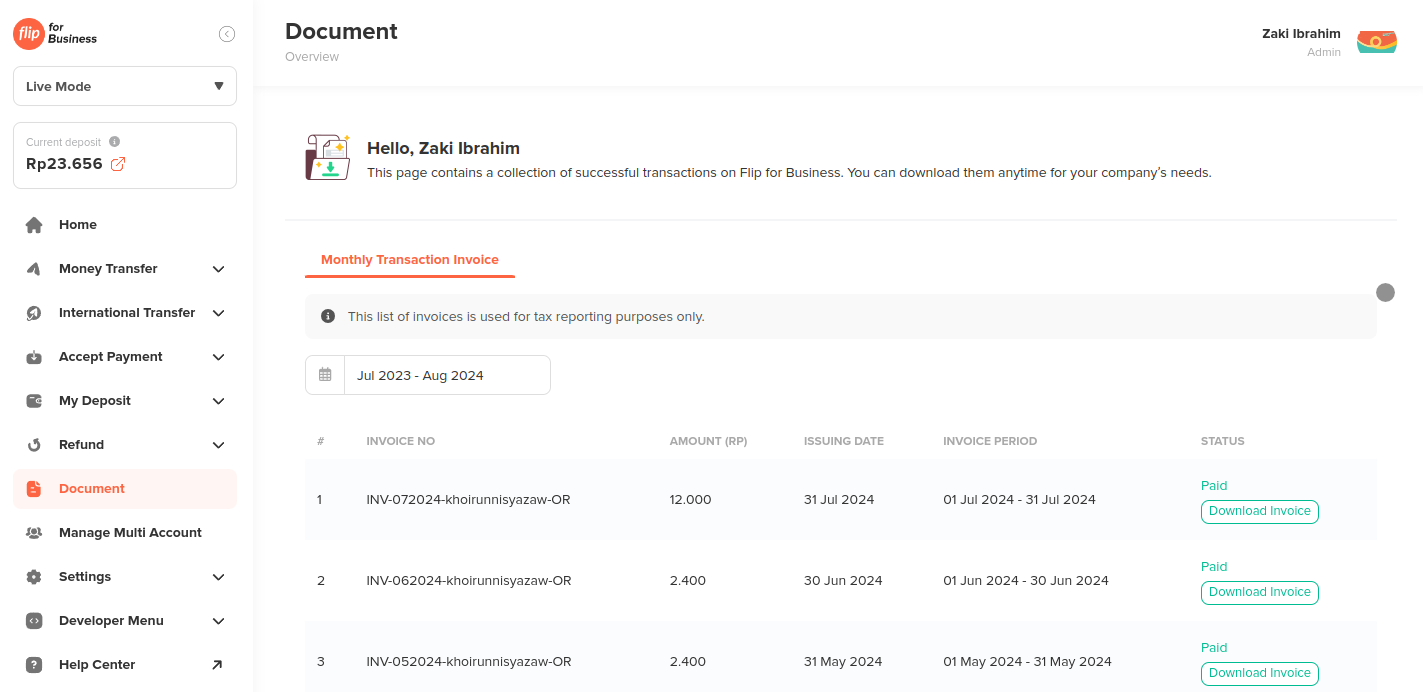
- Navigate to the Document Section
- After logging in to your Flip for Business account, locate the left-hand menu on your dashboard.
- Click on the Document menu option.
- Select the Invoice Period
- Once you are in the Document section, you'll see a list of available invoices.
- Use the date selector to choose the invoice period you want to download. For example, if you need the invoice for July 2024, select the period "Jul 2023 - Aug 2024."
- Download the Invoice
- Scroll down to find the specific invoice you wish to download.
- Click the Download Invoice button next to the corresponding invoice number.
- Save the Invoice
- The invoice will be downloaded to your device in PDF format.
- Save it to your preferred location for easy access and future reference.
By following these steps, you can efficiently manage and download your invoices for Flip for Business.
Manage User Accounts
This feature allows you to efficiently manage access to the Flip for Business Dashboard by adding new users with specific roles. This feature is ideal for teams that require multiple users with varying permissions to access the dashboard.
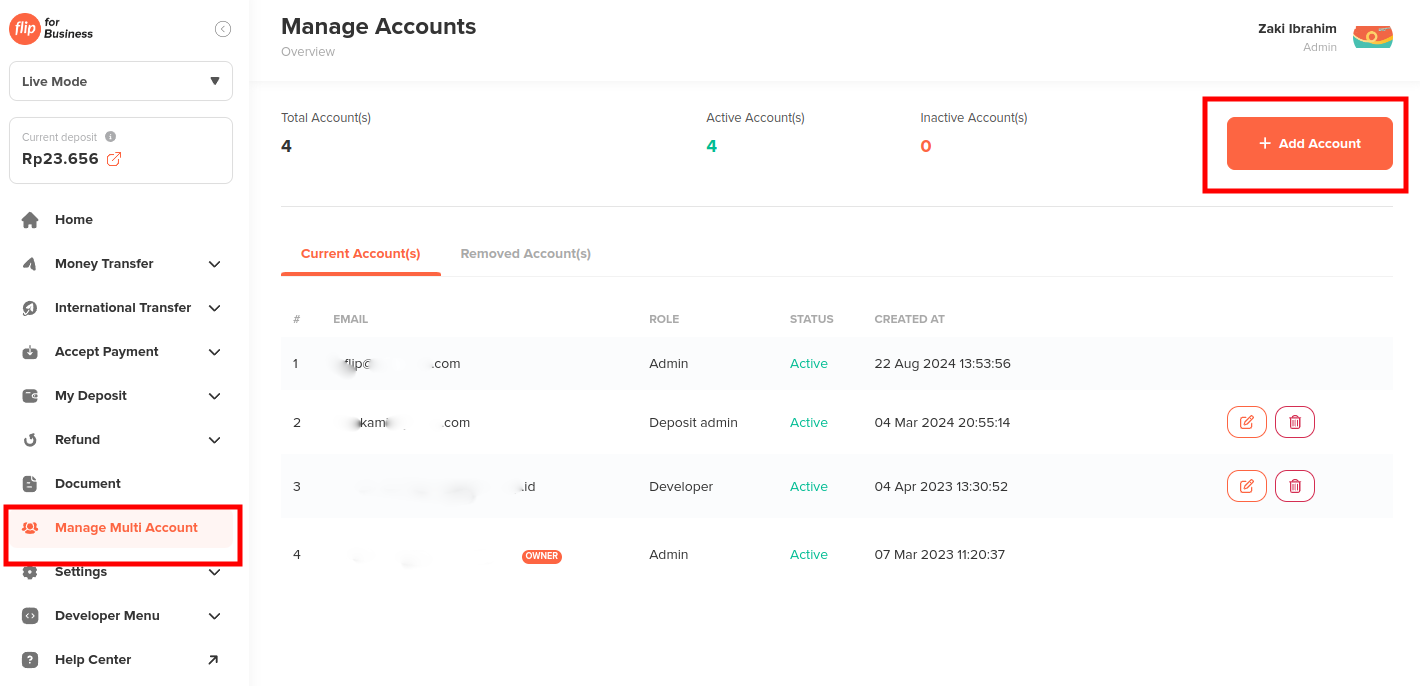
Steps to Add User:
- Go to Manage Multi Account:
Navigate to the left menu sidebar and select "Manage Multi Account." - Click "Add Account" button:
On the top right corner of the page, click the "Add Account" button. - Fill in User Details:
Enter the email address and phone number of the user you wish to add. - Select User Role:
Choose the appropriate role for the new user from the available options. - Click "Add Account":
Click the "Add Account" button to continue add the new user to your dashboard. Then the popup confirmation will appear.
- Click "Yes, Add Account":
Then the new user will be receive email confirmation, and new user able to access the Flip Dashboard.
By following these steps, you can easily manage user access to the Flip Dashboard, ensuring that each team member has the appropriate level of access.
- Multiple roles is not allowed
- The maximum number of multi-accounts that can be associated with one Flip for Business account is 20 accounts.
- The Customer Service role can only view transactions from the last 7 days. To view other transactions, the user can use the search feature.
User Role
The Flip Dashboard offers eight distinct user roles, each tailored to specific responsibilities and levels of access within the platform. Below is an overview of each role:
| Role | Admin | Approver | Reviewer | Deposit Admin | Executor | Maker | Developer | Customer Service |
|---|---|---|---|---|---|---|---|---|
| View Transaction and Deposit History | ✅ | ✅ | ✅ | ✅ | ✅ | ✅ | ✅ | ✅* |
| Download Transaction and Deposit Reports | ✅ | ✅ | ✅ | ✅ | ✅ | ✅ | ✅ | ❌ |
| Top Up Deposit | ✅ | ✅ | ❌ | ✅ | ✅ | ❌ | ❌ | ❌ |
| Create Transactions | ✅ | ❌ | ❌ | ❌ | ✅ | ✅ | ❌ | ❌ |
| Approve Transactions | ✅ | ✅ | ❌ | ❌ | ✅ | ❌ | ❌ | ❌ |
| Request Refund and View Refund Transaction History | ✅ | ❌ | ❌ | ✅ | ✅ | ❌ | ❌ | ✅ |
| Managing the API | ✅ | ❌ | ❌ | ❌ | ❌ | ❌ | ✅ | ❌ |
| Account & Profile Settings | ✅ | ❌ | ❌ | ❌ | ❌ | ❌ | ❌ | ❌ |
| Multi Account Settings | ✅ | ❌ | ❌ | ❌ | ❌ | ❌ | ❌ | ❌ |
The Customer Service role can only view transactions from the last 7 days. To view other transactions, the user can use the search feature.
Retrieveing API Secret Key and Validation Token
To integrate with our services, you'll need an API key from the Flip Dashboard. Follow the steps below to retrieve your key:
- Log in to the Flip Dashboard
Access the Flip Dashboard and log in using your credentials. If you don’t have an account, you will need to sign up first. - Navigate to the Manage API
Once logged in, go to the Manage API page. This can typically be found under the Developer Menu.
- Test Mode/Sandbox
- Live Mode/Production
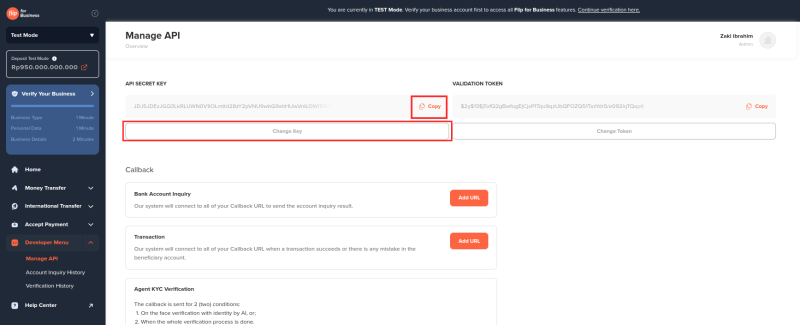
- Select or Change an API Key/Validation Token
- If you already have an API key, you can find it listed on Manage API menu.
- To generate a new key, click on Change button and input your Flip dashboard account password.
- the Change Key button for API Secret Key
- the Change Token button for Validation Token
- Copy the API Key or Validation Token
Click on the Copy button next to the key to copy it to your clipboard. Ensure you keep this key secure, as it grants access to your Test Mode/Sandbox account’s resources.
For Live Mode/Production the API secret key is one-time view only. If you lose this key. You will need to generate a new one
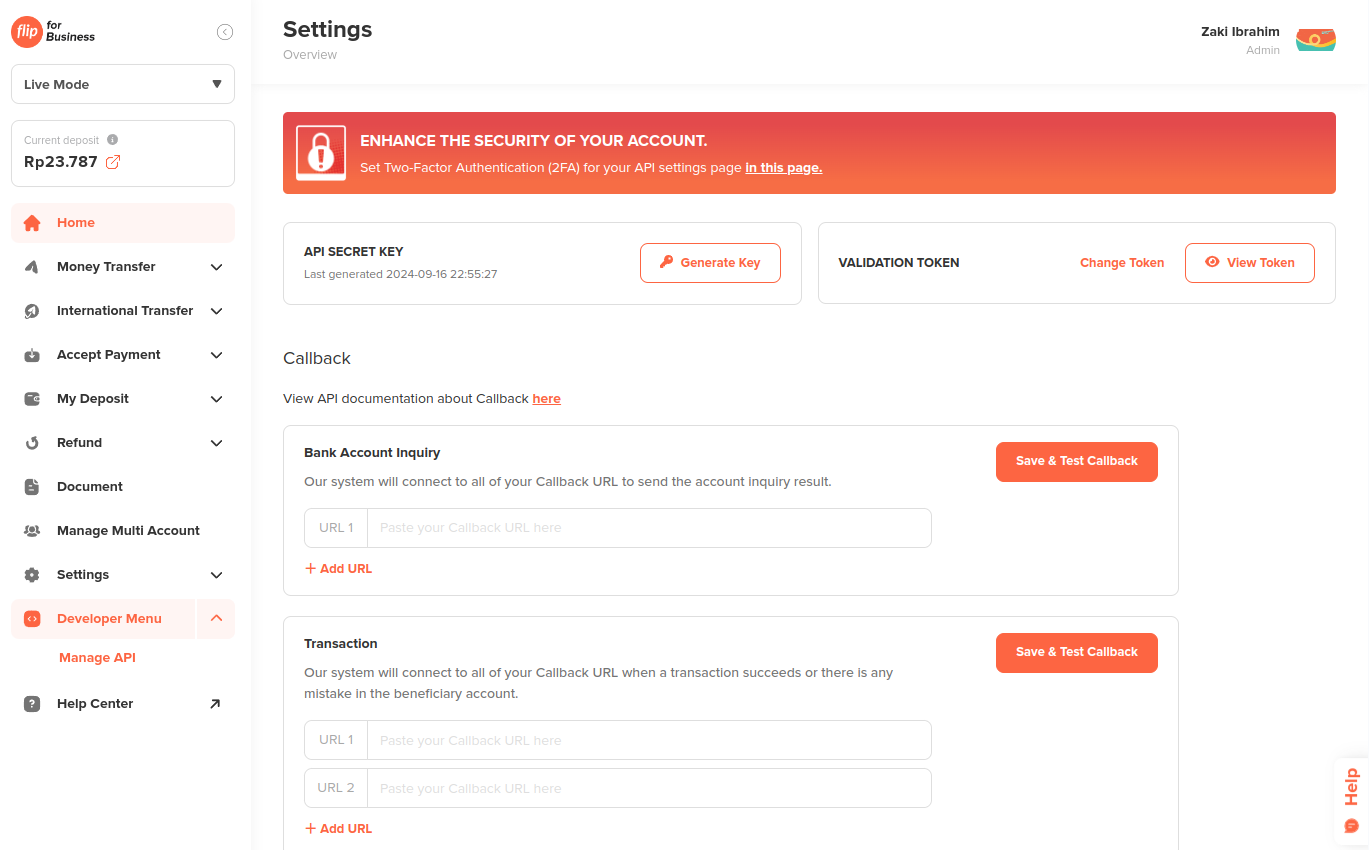
- Change or Generate an API secret key
- For Live Mode/Production environment the API Secret Key is one-time view only. So if you lose the api secret key you need to generate a new one by click
Generate Key. - Choose whether Whatsapp or SMS to receive the OTP.
- The final step is input OTP that Flip send via Whatsapp or SMS
- For Live Mode/Production environment the API Secret Key is one-time view only. So if you lose the api secret key you need to generate a new one by click

- Copy the API Secret Key
Click on the Copy button next to the key to copy it to your clipboard. Ensure you keep this api secret key secure, as it grants access to your Live Mode/Production account’s resources.
Developer menu can be accessed by user with user roles Admin or Developer
Configure your Callback URL
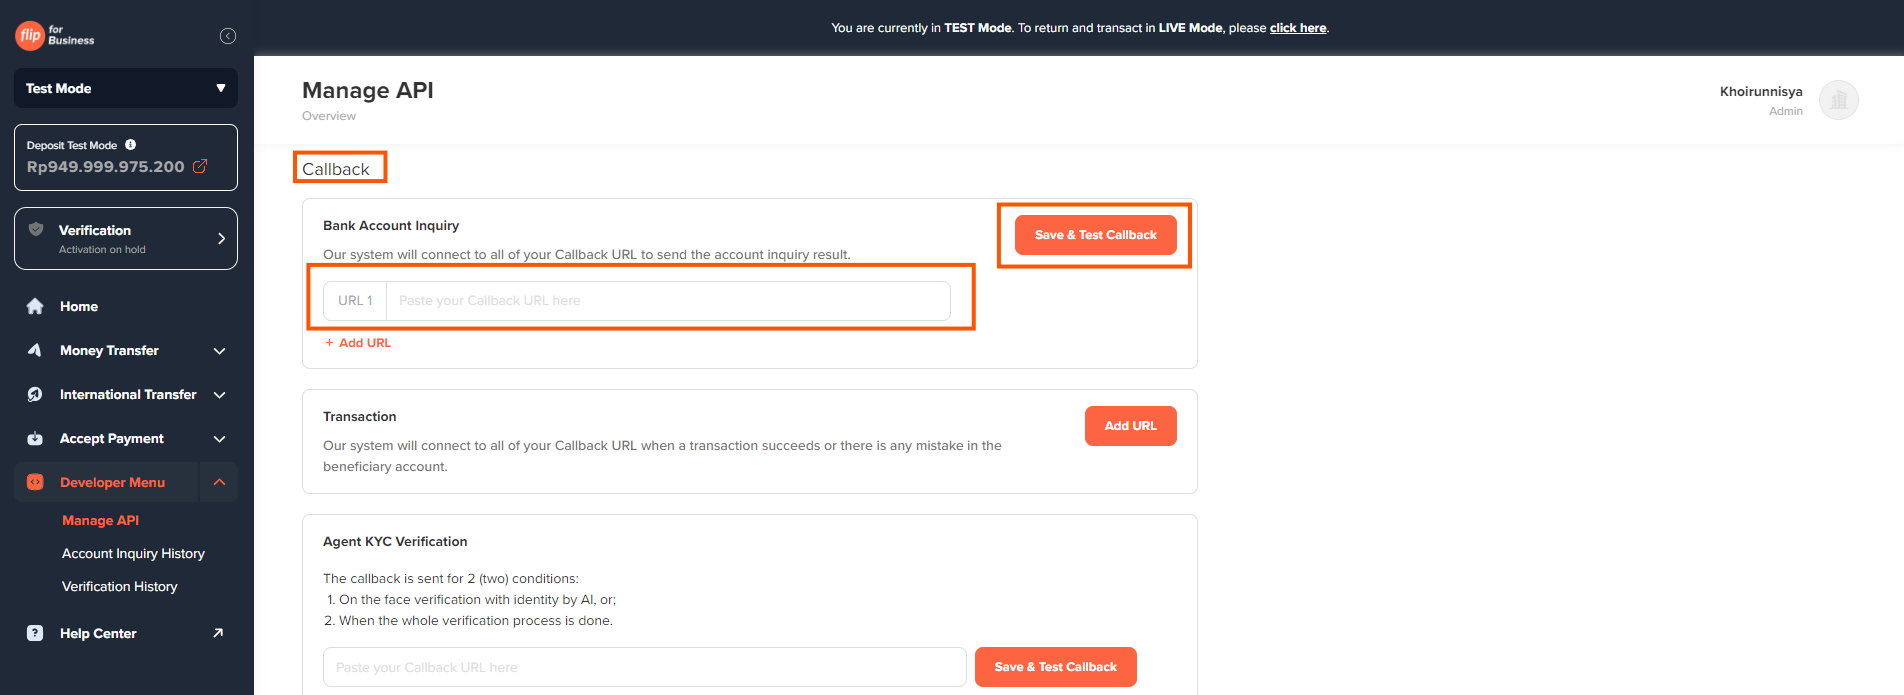
-
Log in to the Flip Dashboard
Access the Flip Dashboard and login using your credentials. -
Navigate to the Manage API
Navigate to the Developer Menu in the Flip for Business dashboard and select Manage API. -
Find the product you're integrating & save the Callback URL
In the Callback section, locate the product you are integrating with under the Callback URL section and save your callback URL there.We suggest creating a specific callback URL for each product you are integrating with. For example, if you are integrating with the Disbursement API, you should configure the Account Inquiry and Transaction webhook URLs accordingly, and do the same for other products.
The Manage API menu only can be accessed by user with user roles Admin or Developer.