Overview
Flip for Business enables you to accept payments from your customers using a variety of methods, including Bank Transfers, Virtual Accounts, E-Wallets, QRIS, Credit Cards, and Retail options.
All payment links, transactions, and related details can be monitored through the Flip for Business dashboard and various API endpoints.
You can integrate with the Accept Payment APIs based on the specific flow you want to offer your customers.
Step for Integration
To ensure a smooth integration with Flip's Accept Payment API, please follow the steps outlined below. This process will guide you from initial testing to live production, ensuring that your system is fully prepared for a seamless operation. To integrate with Accept Payment, please follow the steps given below:
1. Preparation Steps Before Integration
-
Testing in Test Mode/Sandbox
Start by testing your integration in the Test Mode/Sandbox environment. You can access it here: Flip Sandbox Overview. -
Preparing and Retrieving API Secret Keys
To verify that the HTTP requests we receive are genuinely from you, it's crucial to use basic authentication with your API Secret Key for every request you send. Flip’s API Gateway employs basic access authentication. The format is[username]:[password]; use your API Secret key as the username and leave the password field empty. Then, encode this string in Base64. The resulting encoded string must be included in the Authorization HTTP header for every API call. For development make sure you use the Test environment's API Secret Key. Read for more information for Retrieving API Secret Key.- Here’s an example of an authentication string (in plain text) - note the colon:
JDJ5JDEzJDBkRTB6T2tBdk8uQWcvRDU2TTY0TmVQd0NrNC5POVF5elZuQnpJUTJvdWc4a2t0Tm44RnlT:
- And the corresponding Base64 encoded string:
SkRKNUpERXpKREJrUlRCNlQydEJkazh1UVdjdlJEVTJUVFkwVG1WUWQwTnJOQzVQT1ZGNWVsWnVRbnBKVVRKdmRXYzRhMnQwVG00NFJubFQ6
- For the HTTP Authorization header, it should look like this:
Authorization: Basic SkRKNUpERXpKREJrUlRCNlQydEJkazh1UVdjdlJEVTJUVFkwVG1WUWQwTnJOQzVQT1ZGNWVsWnVRbnBKVVRKdmRXYzRhMnQwVG00NFJubFQ6
Base64 Code Simulator
Live Editorfunction Base64Encoder() { // Replace the value with your test mode API Secret Key const apiSecretKey = 'JDJ5JDEzJDBkRTB6T2tBdk8uQWcvRDU2TTY0TmVQd0NrNC5POVF5elZuQnpJUTJvdWc4a2t0Tm44RnlT' const [encodedString, setEncodedString] = useState(''); useEffect(() => { // Encode the API Secret Key to Base64 const encoded = btoa(`${apiSecretKey} + :`); setEncodedString(encoded); }, [apiSecretKey]); return ( <div> <h2>Base64 Encoded String:</h2> <p>{encodedString}</p> </div> ) }
ResultLoading... - Here’s an example of an authentication string (in plain text) - note the colon:
2. Create Bill / Payment Link
To receive payments through Flip for Business, you need to create a bill or payment link that can be shared with your customers. By using the payment link, you can redirect users to Flip's web page, where they can complete the payment using a variety of available payment methods.
Flip offers several integration flows or steps for Accept Payment. Here are the differences between these flows:
Flow 1 and 2: These can be used if you don't have the time or resources to create your own checkout page. You can simply redirect your customers to Flip’s checkout page, where they can complete their payment.
Flow 3: This flow allows you to fully customize the UI or design of the checkout page within your own application, without needing to redirect to Flip’s checkout page. However, if you still prefer to redirect customers to Flip, you can also use the payment link provided by Flip.
Request Details
| Environment | Method | URL |
|---|---|---|
| Test Mode | POST | https://bigflip.id/big_sandbox_api/v2/pwf/bill |
| Live Mode | POST | https://bigflip.id/api/v2/pwf/bill |
| Requirement | Description |
|---|---|
| API Secret Key | The api key that will be used to authenticate the request. For more details, refer to Retrieving API Access Keys. |
title | The title of the bill. |
type | Bill type, Acceptable value : SINGLE or MULTIPLE |
amount | Payment amount, minimum Rp10.000. Leave blank if want to set a flexible amount. Optional for bill created with Step 1 and mandatory for bill created with Step 2/ Step 3. |
expired_date | Bill expiry date. The bill can’t be used any more beyond the expiry date. Format: YYYY-MM-DD HH:mm. |
redirect_url | Redirect URL after payment is success. |
is_address_required | A flag if user needs to input their address when creating payment. 0 = false, 1 = True |
is_phone_number_required | A flag if user needs to input their phone number when creating payment. 0 = false, 1 = True |
step | Which step the customers will be redirected to when opening the payment link. |
sender_name | Name of the Customer. |
sender_email | Email of the Customer. |
sender_phone_number | Phone number of the Customer. |
sender_address | Address of the Customer. |
sender_bank | Bank that is used for the payment. Possible value can be seen here |
sender_bank_type | Payment method type. Possible value can be seen here |
If your customer chooses to use bank transfer, they will need to log in to their personal Flip account before completing the payment.
- STEP 1
- STEP 2
- STEP 3
Sample Request:
curl -X POST 'https://bigflip.id/big_sandbox_api/v2/pwf/bill' \
-H 'Content-Type: application/x-www-form-urlencoded' \
-H 'Accept: application/json' \
-H 'Authorization: Basic <Base64(YourSecretKey + :)>' \
-d 'title=Test New Bill' \
-d 'type=SINGLE' \
-d 'amount=45000' \
-d 'redirect_url=https%3A%2F%2Fexample.com' \
-d 'is_address_required=0' \
-d 'is_phone_number_required=0' \
-d 'step=1'
Sample Response:
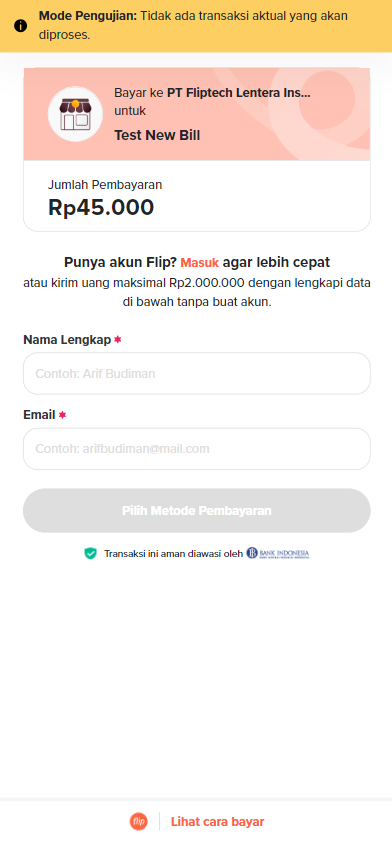
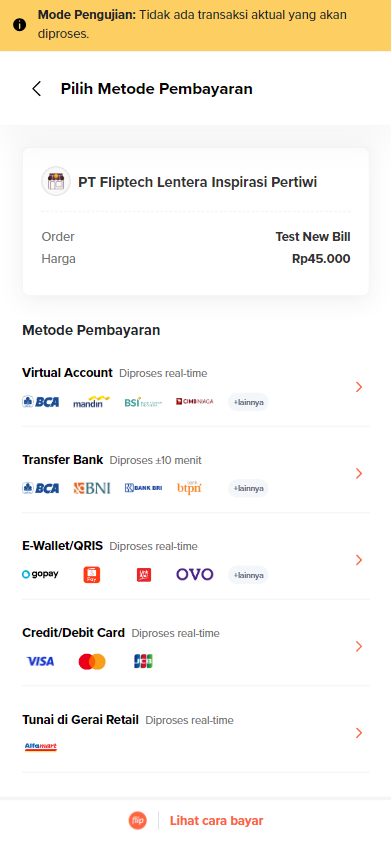
Here is the sample response for Step 1: you can share the payment link provided in the link_url parameter to your customer, or redirect them to Flip’s page, where they will need to enter their name and email before proceeding to the next page to select a payment method.
{
  "link_id": 130068,
  "link_url": "flip.id/pwf-sandbox/$testflip/#test-1542",
  "title": "Test New Bill ",
  "type": "SINGLE",
  "amount": 45000,
  "redirect_url": "https://example.com",
  "expired_date": null,
  "created_from": "API",
  "status": "ACTIVE",
  "is_address_required": 0,
  "is_phone_number_required": 0,
  "step": 1
}
3. Pay Bill Step 1
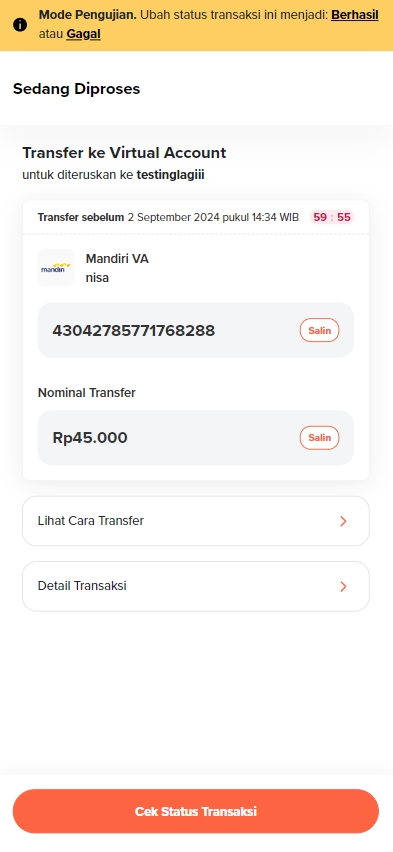
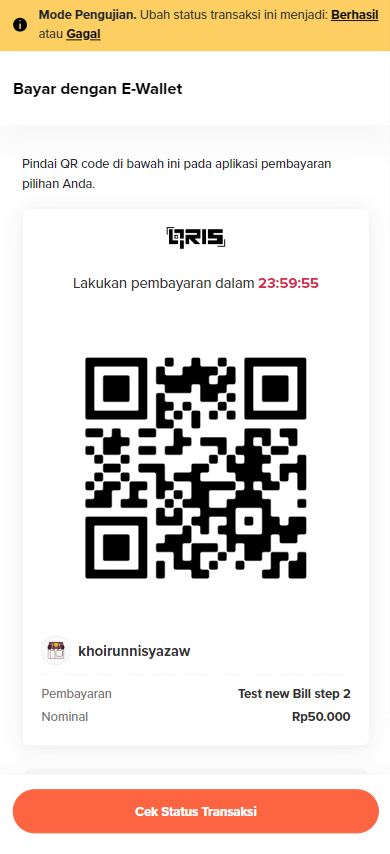
Customers can pay their bill by opening the payment link, entering their name and email, and then selecting their preferred payment method. You can simulate a payment using the following payment link.
Sample Request:
curl -X POST 'https://bigflip.id/big_sandbox_api/v2/pwf/bill' \
-H 'Content-Type: application/x-www-form-urlencoded' \
-H 'Accept: application/json' \
-H 'Authorization: Basic <Base64(YourSecretKey + :)>' \
-d 'title=Test New Bill step 2' \
-d 'type=SINGLE' \
-d 'amount=45000' \
-d 'redirect_url=https%3A%2F%2Fexample.com' \
-d 'step=2' \
-d 'sender_name=Jon Snow' \
-d 'sender_email=jon.snow@example.com' \
-d 'sender_phone_number=0812345678' \
-d 'sender_address=jakarta selatan'
Sample Response:
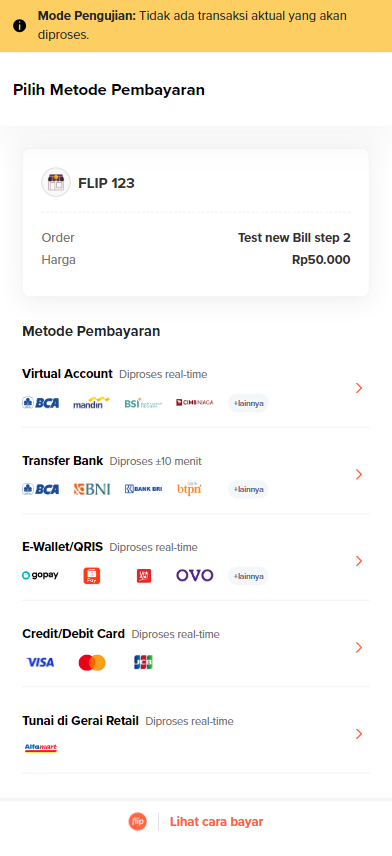
Here is the sample response for Step 2: you can share the payment link provided in the link_url parameter with your customer, or redirect them to Flip’s page, where they will then be directly taken to the payment method selection page.
{
  "link_id": 130080,
  "link_url": "flip.id/pwf-sandbox/$testflip/#test-3325",
  "title": "Test New Bill step 2",
  "type": "SINGLE",
  "amount": 45000,
  "redirect_url": "https://example.com",
  "expired_date": null,
  "created_from": "API",
  "status": "ACTIVE",
  "is_address_required": 0,
  "is_phone_number_required": 0,
  "step": 2,
  "customer": {
    "name": "Jon Snow",
    "email": "jon.snow@Example.com",
    "address": null,
    "phone": null
  }
}
3. Pay Bill Step 2
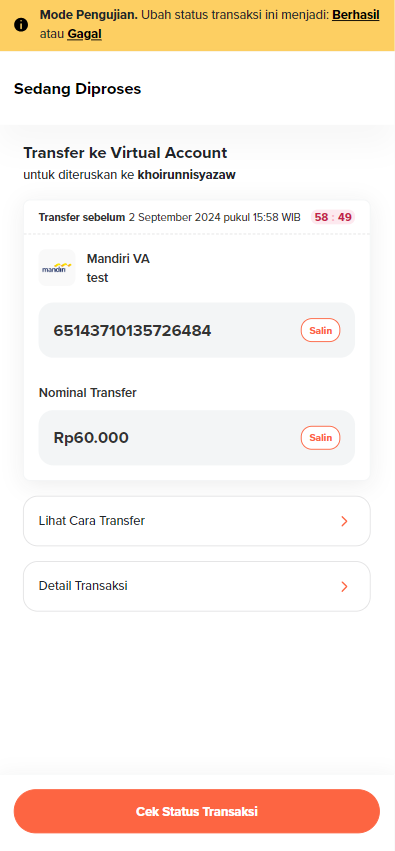
Customers can pay their bill by opening the payment link, and then selecting their preferred payment method. In Step 2, they don't need to entering name & email cause it already send through Create Bill API Request. You can simulate a payment using the following payment link.
Sample Request:
curl -X POST 'https://bigflip.id/big_sandbox_api/v2/pwf/bill' \
-H 'Content-Type: application/x-www-form-urlencoded' \
-H 'Accept: application/json' \
-H 'Authorization: Basic <Base64(YourSecretKey + :)>' \
-d 'title=test' \
-d 'type=SINGLE' \
-d 'amount=45000' \
-d 'redirect_url=https://example.com' \
-d 'step=3' \
-d 'sender_name=Jon Snow' \
-d 'sender_email=jon.snow@example.com' \
-d 'sender_bank=mandiri' \
-d 'sender_bank_type=virtual_account'
Here is the sample response for Step 3: in this step, you can design the payment page according to your preferences without using Flip's UI or redirecting your customers to Flip. If you still wish to share the payment link with your customers, you can use the payment URL provided in the response.
{
  "link_id": 130088,
  "link_url": "flip.id/pwf-sandbox/$testflip/#test-7072",
  "title": "test",
  "type": "SINGLE",
  "amount": 45000,
  "redirect_url": "https://example.com",
  "expired_date": null,
  "created_from": "API",
  "status": "ACTIVE",
  "is_address_required": 0,
  "is_phone_number_required": 0,
  "step": 3,
  "customer": {
    "name": "Jon Snow",
    "email": "jon.snow@example.com",
    "address": null,
    "phone": null
  },
  "bill_payment": {
    "id": "PGPWF10117252552383992345",
    "amount": 45000,
    "unique_code": 0,
    "status": "PENDING",
    "sender_bank": "mandiri",
    "sender_bank_type": "virtual_account",
    "receiver_bank_account": {
      "account_number": "65143710135726484",
      "account_type": "virtual_account",
      "bank_code": "mandiri",
      "account_holder": "Jon Snow"
    },
    "user_address": null,
    "user_phone": null,
    "created_at": 1725255238
  },
  "payment_url": "https://flip.id/pwf-sandbox/transaction/consolidated?redirected_from=internal&id=2ba565331b03401a8b04fe643bd15db3"
}
3. Pay Bill Step 3
In Step 3, if you want to use Flip's checkout page, you can redirect your customers to this payment link. You can simulate a payment using the following payment link.
Refer to this page for more information about the Accept Payment API Reference.
4. Handling Accept Payment Callback
When customer already paid the bill or the bill is expired, Flip will send a request to your specified webhook URL in your Flip for Business dashboard. This type of asynchronous request is known as a Callback. Flip will send an HTTP POST request to the callback URL you configured. This callback is critical for confirming the success of the transaction and updating your system accordingly.
We will hit your URL using POST request with content type application/x-www-form-urlencoded and payload as described below:
| Attribute | Description |
|---|---|
| data | JSON object string with content exactly the same as the response of disbursement (see example below) |
| token | Validation token to ensure that the callback is coming from our server. You can get your token in your Flip for Business dashboard. |
Sample CURL:
curl -X POST 'https://your-domain-callback-url.com/flip/disbursement/callback' \
  -H 'Accept: application/json' \
  -H 'Content-Type: application/x-www-form-urlencoded' \
  -d 'data={"id":"FT1","bill_link":"flip.id/$<company_code>/#<product_code>","bill_link_id":4740,"bill_title":"Cimol Goreng","sender_name":"Jon Doe","sender_bank":"bni","sender_email":"email@email.com","amount":10000,"status":"SUCCESSFUL","sender_bank_type":"bank_account","created_at":"2021-11-29 10:10:10"}&token=YOUR_VALIDATION_TOKEN_KEY'
Steps to Handle the Callback:
- Receive the Callback:
- The callback will include various transaction details such as the transaction ID, customer data, amount transferred, status, bank code,
and other relevant information.
- SUCCESSFUL
- CANCELLED
- FAILED
data={
  "id": "PGPWF10117252588865176637",
  "bill_link_id": 130110,
  "bill_link": "flip.id/pwf-sandbox/$fliptechlenterainspirasipertiwi-1/#testnewbill-2536",
  "bill_title": "Test New Bill ",
  "sender_name": "nisa",
  "sender_email": "khoirunnisyazaw@yahoo.com",
  "sender_bank": "mandiri",
  "sender_bank_type": "virtual_account",
  "amount": 45000,
  "status": "SUCCESSFUL",
  "created_at": "2024-09-02 13:34:46"
}&token=$2y$13$UsffNb9Y69sU4r5PzWgPwu038C28EUTM8wxSe4COTImnKbtQMnjzKxxsd
A callback with a
CANCELLEDstatus can only occur when the bill or transaction is expired. This happens when your customer haven't finish the transaction until the expiry time.data={
"id": "PGPWF22595173324048856",
"bill_link_id": 130110,
"bill_link": "flip.id/pwf-sandbox/$fliptechlenterainspirasipertiwi-1/#testnewbill-2536",
"bill_title": "Test New Bill ",
"sender_name": "nisa",
"sender_email": "ap-static-va-testing@gmail.com",
"sender_bank": "qris",
"sender_bank_type": "e_wallet",
"amount": 45000,
"status": "CANCELLED",
"created_at": "2024-09-02 14:17:13"
}&token=$2y$13$UsffNb9Y69sU4r5PzWgPwu038C28EUTM8wxSe4COTImnKbtQMnjzKxxsdA callback with a
FAILEDstatus can only occur if the customer uses bank transfer. This happens when Flip is unable to forward the funds to the merchant's account.data={
"id": "PGPWF210601",
"bill_link_id": 130110,
"bill_link": "flip.id/pwf-sandbox/$fliptechlenterainspirasipertiwi-1/#testnewbill-2536",
"bill_title": "Test New Bill ",
"sender_name": "MIRACLE NARISWARI",
"sender_email": "772111002@civitas.id",
"sender_bank": "bca",
"sender_bank_type": "bank_account",
"amount": 2006500,
"status": "FAILED",
"created_at": "2024-07-09 11:00:40"
}&token=$2y$13$UsffNb9Y69sU4r5PzWgPwu038C28EUTM8wxSe4COTImnKbtQMnjzKxxsd
- The callback will include various transaction details such as the transaction ID, customer data, amount transferred, status, bank code,
and other relevant information.
- Verify the Accept Payment Status:
- The
statusfield will indicate the outcome of the transaction. For example:SUCCESSFULsignifies that the transaction was completed successfully.
- Based on the status, you can determine whether to finalize the transaction on your end.
- Additionally, you can verify the callback status by using Flip's Get Payment API. You can retrieve the transaction details by the link id from Create Bill response to get the latest status transaction.
- The
- Process the Transaction:
- If the transaction status is
SUCCESSFUL, you should update your internal records to indicate the transaction was completed. - If the transaction status is
CANCELLED, it means the bill has expired, and your customer can no longer make the payment. - If the transaction status is
FAILED, this can only occur if the customer selected the Bank Transfer payment method. This failure happens when Flip is unable to transfer the funds to the merchant's bank account.
- If the transaction status is
- Respond to the Callback:
- It is mandatory to respond to the callback. If the webhook URL returns a non-200 HTTP Status Code or if Flip doesn’t receive any response within 30 seconds (timeout), Flip will retry the request 5 times, with a 2-minute interval between retries.
- You may choose to respond immediately to Flip and then process the callback data asynchronously to ensure timely acknowledgment.
Important Notes
-
Postman Collection: For easier integration and testing, download our Postman Collection here: Flip Postman Collection.
-
IP Address: The IP address that will be used to send requests to Flip must be listed in the UAT document (link provided above).
-
Subscribe to Flip Status Page to receive real-time updates on maintenance and system status.
If you have any further questions, please reach out to B2B API Integration team. Thank you!